ConTeXt学习笔记
欢迎加入本人建的"LuaTeX ConTeXt 学习互助"群:431714622,互助学习LuaTeX ConTeXt LaTeX相关技术,以及通过Lua、Python实现格式化文本、数据的自动排版。
注意:为了避免本博客的jinja引擎误解析,已经在{+#之间,以及对应的}之前加入空格
本文主要学习如下资料的笔记:
涉及LuaTeX的部分,请参见LuaTeX-CLD-TEX学习笔记。
引言#
ConTeXt格式的目标是通用排版,更适合设计;而LaTeX最初目标是数学相关的学术排版。
ConTeXt版本:
- MKII,已经冻结,使用PDFTEX (和XETEX);
- MKIV,使用LUATEX (和LUAJITTEX)
- LMTX,最新版,还在进化,使用LuaMetaTeX引擎
学习资源#
环境和编译#
命令#
编译脚本文档
1 2 3 4 | |
其他命令行选项(通过--help选项查看)
1 2 3 4 5 6 7 8 9 10 11 12 13 14 15 16 17 18 19 20 21 22 23 24 25 26 27 28 29 30 31 32 33 34 35 36 37 38 39 40 41 42 43 44 45 46 47 48 | |
使用官方vscode扩展#
必须打开指定的颜色主题ConTeXt;只有语法高亮,没有Snippet(可以使用Tabnine)。
1 | |
vscode语法高亮插件#
ConTeXt Syntax
搜索路径#
排版脚本、宏插件、字体文件等,似乎也遵循以下规则。
以下参考:context reference manual 2.4 Directories
在工作目录中找不到的文件,ConTEXt会搜索父目录们。也就是说环境文件(environment)可以放在产品文件的父目录中。例如:
- /texfiles/course/layout.tex
- /texfiles/course/teacher/manual.tex
- /texfiles/course/student/learnmat.tex
- /texfiles/course/otherdoc/sheets.tex
后三个文件在不同的字目录中,都使用相同的环境文件layout.tex。
以下参考 https://tex.stackexchange.com/questions/330771/context-configuration
ConTeXt搜索\environment文件的次序如下:
- 当前目录( current directory,即运行
contex的PWD,而不是tex主文件所在的PWD) - 父目录 ../
- 祖目录 ../../
- \(TEXMF/tex/context// 之下的目录(\)TEXMFHOME/tex/context/
/,在Mac/Linux中,\(TEXMFHOME默认为\)HOME/.texmf)
ConTeXt遵循TeX目录结构(TeX Directory Structure,简称TDS)。TDS手册:tug.org/tds/tds.html。
以下参考: https://tex.stackexchange.com/questions/192542/get-or-change-context-path-for-components-projects-environment
还可以指定路径:
- \usepath[...]
- \usesubpath[...]
instruction 指令 /command 命令:#
- control sequence 控制序列
- primitive 基元
- macro 宏
- control symbol
- control word
ConTeXt指令一般只分为保留字(所构成的控制符号?)和命令两类:
- 控制符号:
\+非字母(符号) - 命令:
\+字母词(直到遇到一个非字母前终止,如果遇到一个或多个空白字符则将其丢弃,可用{}作为边界,或用\␣显式保留空格)
11个保留字\ % { } # ~ | $ _ ^ &;没有保留字参与的情况下,都视作一般文本。要想输入这些字符,除以下三者,都可以用\先转义:
\ \backslash
~ \lettertilde
^ \letterhat
也可以用\type*{*或\type+}+输入。
组和环境#
{ ... },或\bgroup ... \egroup,两对控制序列同义,可以混用\begingroup ... \endgroup,允许更深层的错误检查\start ... \stop- 数学环境:
$ ... $ - 某些命令/环境:
\startSomething ... \endsomething - 某些命令会自动生成一个组,如\hbox, \vbox
组是一个明示的作业单元/解释单元。组内的定义、格式、赋值,组外无效。
组还可以用来界定前面命令的作用范围/输入范围,比如$4^2x$表示\(4^2x\),而$4^{2x}$表示\(4^{2x}\)
空组没有显示意义,但可以用来表示命令边界(比如避免吃掉后面的空格)。
环境一般用于段落以上的内容,除非用\bgroup ... \egroup明示为组,否则不是组。
1 2 3 4 5 6 7 8 9 | |
命令语法#
\command[Option1, Option2, ...]\command[Variable1=value, Variable2=value, ...]- 不能这样:
\command[Option1, Variable1=value, ...]
成套命令#
- command (or environment) 直接使用
- definecommand,克隆现存command,定义别名
- setupcommand,配置现存command或别名
比如: * \FRAMEDTEXT 命令 * \framedtex 实例 * \startFRAMEDTEXT ... \stopFRAMEDTEXT 环境命令 * \startframedtext ... \stopframedtext * \defineframedtext 定义实例(继承原命令的属性) * \setupframedtext 配置实例 * \setupframedtexts 一个配置多个实例
1 2 3 4 5 6 7 8 9 10 11 12 13 14 | |
设置变量#
1 2 3 4 5 6 7 8 9 10 11 12 13 14 15 16 17 18 19 20 21 22 23 24 25 26 27 28 29 30 31 32 | |
另有定义和赋值可用:Definitions_and_Assignments)
- \setvalue {name}{...} = \def\name{...}
- \setgvalue {name}{...} = \gdef\name{...}
- \setevalue {name}{...} = \edef\name{...}
- \setxvalue {name}{...} = \xdef\name{...}
- \letvalue {name}=... = \let\name=...
- \getvalue {name} = \name
- \resetvalue {name} = \def\name{}
定义命令#
直接是用tex的\def,或者\define,或者前述定义和赋值\setvalue \getvalue
\define[NumArguments]\CommandName{TeXtToReplace}
- NumArguments,参数数量,可省略。
- CommandName,命令名称,遵守一般命令名规范,可以是单个非字母,或一个至多个字母
- TextToReplace,命令展开后原位置要替换成的文本,包括格式。
\define 相当于\unexpanded\def; \defineexpandable 相当于 \def.
1 2 3 4 5 6 7 8 9 10 | |
命名参数#
mkvi(扩展名,或脚本首行标出% macros=mkvi)格式可以使用命名参数,而不限于编号参数:
1 2 3 4 5 6 7 8 9 | |
可选参数#
分两步处理可选参数:
https://wiki.contextgarden.net/Commands_with_optional_arguments
1 2 3 4 5 6 7 8 9 10 11 12 13 14 15 16 17 | |
键值对参数#
参考 * Commands_with_KeyVal_arguments) * 系统宏的键值对参数
lua用例:
1 2 3 4 5 6 7 8 9 10 11 12 13 14 | |
ConTeXt和tex用例见链接。
关于用lua处理命令的逻辑,另见Programming_in_LuaTeX
定义环境/startstop宏/命令#
\definestartstop[Name][Options]
1 2 3 4 5 6 7 8 9 10 11 12 13 14 15 | |
构建成套的命令#
tex原语\csname可用于构建用\def和\let不能构建的命令:
1 2 | |
前后缀控制等详情见链接。
尺寸#
| Name | Name in ConTEXt | Equivalent |
|---|---|---|
| Inch | in | 1 in = 2.54 cm |
| Centimetre | cm | 2.54 cm = 1 inch |
| Millimetre | mm | 100 mm = 1 cm |
| Point | pt | 72.27 pt = 1 inch |
| Big point | bp | 72 bp = 1 inch |
| Scaled point | sp | 65536 sp = 1 point |
| Pica | pc | 1 pc = 12 points |
| Didot | dd | 1157 dd = 1238 points |
| Cicero | cc | 1 cc = 12 didots |
| 当前“M”的宽度 | em | |
| 当前“x”的高度 | ex |
1 2 3 4 5 6 7 | |
某些尺寸使用弹性赋值
\MeasureName plus MaxIncrement minus MaxDecrease
1 | |
输入特殊字符#
- 空格和tab \␣
- 不断行空格 ~
- 两个以上的断行为段(显示为空行),也可用一个显式空行\blank代替
- 有时断行被解释为一个空格,而行尾注释%以避免引入空格(写宏的时候)
- 破折号与连接号:断词用
-,输入-或\hyphen;连接数字用–,输入--或\endash;连接句子用—,输入---或\emdash;减号/负号用−,输入$-$或\minus。
文档与项目结构#
1 2 3 4 5 6 7 8 9 | |
插入文件内容
\input FileName\ReadFile{FileName}% 文件不存在时不会报错\readfile{FileName}{TextIfExists}{TextIfNotExists}
1 2 3 4 5 6 7 8 9 10 | |
环境文件
命名法:MyMacros_env.tex或env_MyMacros.tex
1 2 3 4 5 6 | |
插入环境文件内容的方法:
\environment File\environment[File]
组件文件
1 2 3 4 5 6 | |
成品文件
1 2 3 4 5 6 7 8 | |
项目文件
1 2 3 4 5 6 7 8 | |
页面和分页#
- 版面逻辑尺寸和印刷物理尺寸(通常一致)
\setuppapersize[LogicalPage][PhysicalPage] - 自定义尺寸常量: \definepapersize
- 拼版
\setuparranging - 显式版面框架: \showframe
文档任何位置都可以重设。
纸张适配内容
- \startfittingpage ... \stopfittingpage
- \startTEXpage ... \stopTEXpage,TeX文本适配页
- \startMPpage ... \stopMPpage, MetaPost图形适配页,直接写MetaPost代码,不再需要\startMPcode...\stopMPcode
- \startpagefigure,单一图页面
分页:
- \pagebreak
- \page
页面元素和版面布局#

- 5X5块加空布局;
- 头、顶;脚、底;左右边、沿;
\setuplayout[Name] [Options]
- 给页面组件设置尺寸
- 设置逻辑页在物理页上的位置(结合\setuparranging设置逻辑页布局方式)
多种页面布局:
1 2 3 4 | |
调整指定页面的高度或行数,用于定版前的微调,放导言区:
\adaptlayout[Pages] [Options]
指定布局的页码范围,在导言区:
1 2 | |
单双页布局:
- \definelayout[even]
- \definelayout[odd]
展示页面布局:
- \showsetups
- \showframe
- \showlayout,兼有前二者的功能
获取版心/文本区域宽高:
- \textwidth
- \textheight
设置页码#
- \setuppagenumbering
- \setupuserpagenumber
配合\defineconversionset使用
获取页码:
- \userpagenumber,用户定制页码
- \pagenumber,页码的阿拉伯数字
- \realpagenumber,未考虑定制的实际页码的数字
对应形式的末页页码:
- \lastuserpagenumber
- \lastpagenumber
- \lastrealpagenumber.
建议分页/不分页、强制分页#
\page, \pagebreak
选项:
- no,不建议分页
- preference,建议分页
- bigpreference,强烈建议分页
选项:
- yes,强制分页
- makeup,立即分页,不预先放置挂起的浮动体
- empty,插入空页
- even,插入页直到双页
- odd,插入页直到单页
- left, right,同前两项,仅用于根据单双页转换不同天头、地脚和页边的双册印刷文档
- quadruple,插入页直到4的倍数页
TEX boxe是不能分页的
\vbox{Material}
有些环境使用了盒子,如framedtext,也不会分页。
限制若干行内容在同一页,期间不得分页:
1 2 | |
天头、地脚的配置#
- \setupheadertexts
- \setupfootertexts
1 2 | |
- 日期:date, currentdate;
- 页码:pagenumber;
- 结构: part, chapter, section...;
- 结构序号: partnumber, chapternumber, sectionnumber...
也可使用相应的命令:
\date \currentdate \pagenumber \getmarking[chapter] \getmarking[chapternumber] \getmarking[sectionnumber]
格式化配置:
- \setupheader
- \setupfooter
定义后链接到小节命令中:
1 2 | |
关闭天头地脚\noheaderandfooterlines
生成无页码的页\page[blank]
页面外边edges、内边margins插入元素#
- \setuptoptexts: 上边
- \setupbottomtexts: 下边
- \margindata,实例:
- \inleftmargin defined as \definemargindata[inleftmargin][left][margin=margin,width=\leftmarginwidth,style=,color=]
- \inrightmargin defined as \definemargindata[inrightmargin][right][margin=margin,width=\rightmarginwidth,style=,color=]
- \inoutermargin defined as \definemargindata[inoutermargin][outer][margin=margin,width=\outermarginwidth,style=,color=]
- \ininnermargin defined as \definemargindata[ininnermargin][inner][margin=margin,width=\innermarginwidth,style=,color=]
- \inleftedge defined as \definemargindata[inleftedge][left][margin=edge,width=\leftedgewidth,style=,color=,category=edge]
- \inrightedge defined as \definemargindata[inrightedge][right][margin=edge,width=\rightedgewidth,style=,color=,category=edge]
- \inouteredge defined as \definemargindata[inouteredge][outer][margin=edge,width=\outeredgewidth,style=,color=,category=edge]
- \ininneredge defined as \definemargindata[ininneredge][inner][margin=edge,width=\inneredgewidth,style=,color=,category=edge]
- \atleftmargin defined as \definemargindata[atleftmargin][left][margin=normal,width=\leftmarginwidth,style=,color=]
- \atrightmargin defined as \definemargindata[atrightmargin][right][margin=normal,width=\rightmarginwidth,style=,color=]
- \inleft defined as \definemargindata[inleft][left][margin=margin,width=\leftmarginwidth,align=flushright]
- \inright defined as \definemargindata[inright][right][margin=margin,width=\rightmarginwidth,align=flushleft]
- \inouter defined as \definemargindata[inouter][outer][margin=margin,width=\outermarginwidth,align=inner]
- \ininner defined as \definemargindata[ininner][inner][margin=margin,width=\innermarginwidth,align=outer]
- \inmargin defined as \definemargindata[inmargin][left][margin=margin,width=\leftmarginwidth,align=flushright]
- \inother defined as \definemargindata[inother][right][margin=margin,width=\rightmarginwidth,align=flushleft]
- \margintext defined as \definemargindata[margintext][left][margin=margin,width=\leftmarginwidth,align=flushright,stack=yes]
语法:
\CommandName[Reference][Configuration]{Text}
全局配置页边文本:
\setupmargindata[right][style=slanted]
字体脚本 typescript#
官方配置脚本(增补)
D:\venvs\texlive\2021\texmf-dist\tex\context\fonts\mkiv\type-imp-mscore.mkiv
用法参考: https://wiki.contextgarden.net/Chinese_Japanese_and_Korean
增补用法:
1 2 3 4 5 6 7 8 9 | |
拼音字体设置
1 2 3 4 5 6 7 8 9 10 11 12 13 14 15 16 17 18 19 20 21 22 23 24 25 26 27 28 | |
更新手动安装的(outside of tlmgr)文件数据:context --generate
中文字体设置
参考: http://liyanrui.is-programmer.com/2009/10/21/not-just-for-chinese.12264.html
1 2 3 4 5 6 7 8 9 10 11 12 13 14 15 16 17 18 19 20 21 22 23 24 25 26 27 28 29 30 31 32 33 34 35 36 | |
在文稿中使用:
1 2 3 4 5 6 7 8 9 10 11 12 13 14 15 16 | |
定义后备字体(多语言字体)newsong:
1 2 3 4 5 | |
安装字体#
字体文件可以出放在tex/texmf-fonts/fonts/,或tex/texmf-fonts/fonts/truetype/vendor/fontfamily(注意对应字体类型)
使用系统字体,先设置环境变量:
set OSFONTDIR=C:\Windows\Fonts
索引:
mtxrun --generate mtxrun --script font --reload
查找你想要字体(包括文件名和符号名称),比如:
mtxrun --script fonts --list --all --pattern=pinin
1 2 3 4 5 | |
或列出四种特性:
mtxrun --script fonts --list --spec deng-light
1 2 | |
- weight black bold demi demibold extrabold heavy light medium mediumbold normal regular semi semibold ultra ultrabold ultralight
- style italic normal oblique regular reverseitalic reverseoblique roman slanted
- width book condensed expanded normal thin
- variant normal oldstyle smallcaps
然后定义名称后使用\definefont[pinyin][name:ahpinying*default at 9pt](或定义后立即自动使用\definedfont)。格式如下:
- \definefont[PublicReference][filename*featurenames scaling] % filename可以附加前缀
name:,表示使用符号名称;file:表示使用文件名,可以使用后缀.ttf等;featurenames可以使用预制的default,或使用\definefontfeature定义 - \definefont[PublicReference][filename:featurespecication scaling] % 仅用户XƎTEX样式的字体
- \definefont[PublicReference][filename@virtualconstructor scaling] % 适用于虚拟字体,如数学字体,虚拟特性可参考m-punk.mkiv文件
指定字号的方法:
- at 72pt,有赖于设计尺寸,不可靠
- scaled 2400,硬编码缩放
- sa 2.4,相对于body font尺寸缩放,scaled at the body font size
- \definefont [TitleFont] [Serif sa b]
- \definefont [TitleFont] [Serif],会转换为\definefont [TitleFont] [Serif sa *],展开为当前字体尺寸
字体还可用关键字匹配查询(查找算法比较灵活而复杂/不可靠):
1 2 3 4 5 6 7 8 9 | |
当一个字体文件被分列为多条时,如:
1 2 3 | |
首次无法通过字体文件名或关键字匹配查询来使用,而只能通过主条(最短一条)的identifier(即notoserifcjksc)使用;此后可一通过关键字匹配查询来使用(可能是优先匹配已缓存字体的缘故)。
汉字字间拉伸胶:scrp-cjk.lua,一个测试版本确实补偿了蹩脚的半宽,但我们最好在字体定义时进行补偿,并且/或者只是假设一个正确的字体。
字体颜色特性
颜文字着色
1 2 3 4 5 6 7 8 9 | |
字体知识#
- \setupbodyfont[Options] 设置主字体,影响相关文本元素(如标题),字号范围有限定
- \switchtobodyfont 在特定范围切换正文字体,字号会伸缩至指定大小,不影响标题字号
- \showbodyfont[Options] 查看字体字号信息
- \showfont[FontName]
显式主体字体(风格*变形+字号)\showbodyfont[schola, 8pt]
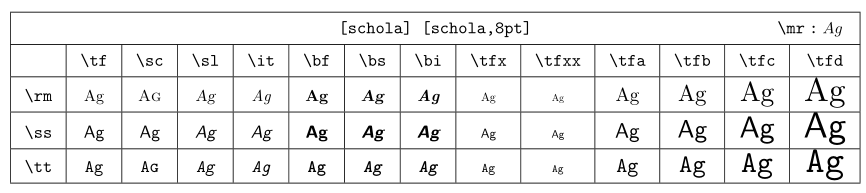
字体抽象层次:
- typeface 字面/字体(所有字体的总称)
- font family / font style 字体风格/字体家族,有特定设计特征的多个字体构成的集合;也可以随意指定不同字体为一族。
- font 字体(字面的子集,有特定的尺寸、字重、风格等)
- alternative 变体
- glyph/character 字模
- alternative 变体
- font 字体(字面的子集,有特定的尺寸、字重、风格等)
font style 字体风格/字体家族
| Style | Symbolic names & Commands |
|---|---|
| Roman | \rm, \roman, \serif, \regular |
| Sans Serif | \ss, \sans, \support, \sansserif |
| Monospaced | \tt, \modo, type, \teletype |
| Handwritten | \hw, \handwritten |
| Calligraphic | \cg, \calligraphic |
font alternative 字体变体
| Alternative | Commands that enable it |
|---|---|
| Normal | \tf(typeface), \normal |
| Italic | \it, \italic |
| Bold | \bf(boldface), \bold |
| Bold-italic | \bi, \bolditalic, \italicbold |
| Slanted | \sl, \slanted |
| Bold-slanted | \bs, \boldslanted, \slantedbold |
| Small caps | \sc, \smallcaps |
| Medieval | \os, \mediaeval |
6个改变字号的变体后缀
{\tfxx test}, {\tfx test}, {\tf test}, {\tfa test}, {\tfb test}, {\tfc test}, {\tfd test}
在段落开头使用临时切换字体命令时,推荐前置\dontleavehmode,以免发生意外的副作用
定制后缀的缩放权重(主字体环境)
- \definebodyfontenvironment[particular size][scaled]
- \definebodyfontenvironment[10pt][a=12pt,b=14pt,c=2, d=3]
- \definebodyfontenvironment[default][scaled]
- \definebodyfontenvironment[default][a=1.3,b=1.6,c=2.5,d=4]
除后缀外,以下关键词也可以定制:big, small, script, scriptscript,会影响这些命令:
- \smallbold
- \smallslanted
- \smallboldslanted
- \smallslantedbold
- \smallbolditalic
- \smallitalicbold
- \smallbodyfont
- \bigbodyfont
显式后缀的缩放权重(主字体环境)
\showbodyfontenvironment[Font]
为字体风格、变形、尺寸定义命令和关键词
- \definebodyfontswitch[eight][8pt]
- \definefontstyle[paloseco][ss]
- \definefontstyle[paloseco, sosa, sinrebordes][ss]
- \definealternativestyle[strong][\bf][]
意大利体、斜体和强调体 \it, \sl and \em
- \setupbodyfontenvironment[default][em=italic]
小型大写与伪小型大写 Small caps and fake small caps
- \cap and \Cap
颜色#
- \definehighlight[important][color=red]
- \important{Very important text}
- \color[ColourName]{Text to colour}
- \color[red]{Very important text}
- \colored[r=0.1, g=0.8, b=0.8]{coloured}
- \startcolor[ColourName] ... \stopcolor
- \setupcolors[textcolor=red]
- \setuphead[chapter][color=blue]
- \setupbackgrounds[page][background=color,backgroundcolor=blue]
预定义颜色
| Name | Light tone | Medium tone | Dark tone |
|---|---|---|---|
| black | |||
| white | |||
| gray | lightgray | middlegray | darkgray |
| red | lightred | middlered | darkred |
| green | lightgreen | middlegreen | darkgreen |
| blue | lightblue | middleblue | darkblue |
| cyan | middlecyan | darkcyan | |
| magenta | middlemagenta | darmagenta | |
| yellow | middleyellow | darkyellow |
预定义色谱
- \showcolor[CollectionName]
- \showcolorcomponents[ColourName]
- \showcolorcomponents[darkgoldenrod]
-
\usecolors[CollectionName]
- \usecolors[xwi]
- \color[darkgoldenrod]{Tweedledum and Tweedledee}
-
“crayola”, 235 colours imitating marker shades.
- “dem”, 91 colours.
- “ema”, 540 colour definitions based on colours used by Emacs.
- “rainbow”, 91 colours for use in maths formulas.
- “ral”, 213 colour definitions from the Deutsches Institut für Gütesicherung und Kennzeichnung (German Institute for Quality Assurance and Labelling).
- “rgb”, 223 colours.
- “solarized”, 16 colours based on the solarized scheme.
- “svg”, 147 colours.
- “x11”, 450 standard colours for X11.
- “xwi”, 124 colours.
自定义颜色
- \definecolor[New colour][Old colour]
- \definecolor[maincolour][0.6(orange)]
- \definecolor[ColourName][Definition]
- \definecolor[lime 1][r=0.75, g=1, b=0]
- \definecolor[lime 2][x=BFFF00]
- \definecolor[lime 3][c=0.25, m=0, y=1, k=0]
- \definecolor[lime 4][h=75, s=1, v=1]
- \definecolor[Azure][h=75, w=0.2, b=0.7]
- \definecolor[light grey][s=0.65]
文档结构#
标题#
https://wiki.contextgarden.net/Titles
章节/题目
| 有编号 | 无编号 |
|---|---|
| \part | — |
| \chapter | \title |
| \section | \subject |
| \subsection | \subsubject |
| \subsubsection | \subsubsubject |
| \subsubsubsection | \subsubsubsubject |
| \subsubsubsubsection | \subsubsubsubsubject |
无编号标题不会出现在目录中(可设置)。
均有Start/Stop版本,方便导出为电子书。
以上都是\SECTION的实例,各有三种用法,以及startstop实例: * \SECTION[reference,...]{text} * \SECTION[reference,...]{number}{text} * \SECTION[...=...,...] * title text * bookmark text * marking text * list text * reference reference * ownnumber text * placeholder text * \startSECTION[...=...,...][...=...,...] ... \stopSECTION,第一个选项同前
ownnumber用于指定编号,替换本处的自动编号;他处自动编号不受影响,即可能造成编号不连续!
1 2 3 4 5 | |
设置:
- \setuphead [Sections][Options]
- \setupheads [Sections][Options]
选项:
- placehead: whose values can be “yes”, “no” “hidden”, “empty” or “section
- number, “yes” and “no”
- “before” “after,标题排版前后执行的命令
- before=\hairline,before=\blank,before={\blank[3*big]}
- after={\blank[0cm]},before={\blank[0cm]}
- before={\nowhitespace},after={\nowhitespace\vskip5pt}
- commandbefore” and“commandafter”,标题文本排版前后执行的命令
- continue=no
- page,前插页
- alignment,“align”会影响包含标题的段落的alignment。可包含“flushleft”(left), “flushright” (right), “middle” (centred), “inner” (inner margin) and “outer” (outer margin)等值。
- Margin
- Width
- indentnext
- alternative,插入时的替代版式:text paragraph normal margin inmargin top middle bottom reverse margintext
- textdistance,标题文本距离
- interlinespace,行间距
有编号的设置会影响无编号,反之不然。 上一级的设置会可能影响下一级,反之不然。
用 \nolist or \nomarking在目录中排除指定字符:
\chapter{Influences of \nomarking{19th century} impressionism \nomarking{in the 21st century}}
获取章节编号headnumber:
1 2 3 | |
必须实际有编号,否则为空。
https://wiki.contextgarden.net/Last_Head_Number
忽略文档结构的独立编号结构(比如贯穿全书的“点评”编号)的实现:Headings_numbered_independent_of_chapters_or_other_headings
目录#
目录是内置的联合列表(combinedlist)。
- 设置目录联合列表:\setupcombinedlist[content][list={chapter,section},alternative=c]
- list选项指定head级别,
\definehead自定义级别必须额外指定 - alternative选项指定版式:a...g,可通过\setuplist设置
- list选项指定head级别,
- 设置目录的pdf交互:\setupinteraction[state=start,focus=width]
- 放置目录:
\completecontent,会在目录前自动生成 \title{目录},目录标题名称可以更改:\setupheadtext[chinese][content=目次]\placecontent,根据放置位置生成其下各级目录,如放在章、节下则只能显式本章、节之下的目录- criterium选项指定内容:all previous [part, chapter, section, subsection..] component
- 条目格式化 \setuplist[Element][Configuration]
- \definelistalternative定义alternative
默认只加入编号的目录, 手动加入未编号head级别:\setuphead[title][incrementnumber=yes]
手动加入指定head实例:
1 2 | |
条目间加入分割:
\writebetweenlist[section]{\hrule}
目录与实际标题不同:
- \SectionType [Options], or with \startSectionType [Options]
- 特定文字不列入列表用
\nolistor\nomarking:\chapter[title={An \nolist{approximate and slightly repetitive}introduction to the reality of the obvious}]
列表和联合列表#
根据列表生成列表、联合列表和目录。列表需要三个元素:
- The number.
- The name or title.
- The page where it is found.
有序号的标题(无序号标题加入选项incrementnumber=yes)和\place...(如\placetable, \placefigure)命令生成的列表,都能满足要求。
生成、设置与使用列表与目录近似:
- \definelist[ListName][Configuration]
- \setuplist[ListName][Configuration]
- \placelist[ListName][Options]
- \completelist
联合列表
- \definecombinedlist[Name][Lists][Options],Lists如
part, chapter, section, subsection,会自动生成放置命令\placeName - \setupcombinedlist
结构列表#
参考
* startitemgroup
* Enumerations
* 段落编号
* 自定义enumeration
用于结构复杂的列表,比如练习题。
\startitemize[Options][Configuration] ... \stopitemize
1 2 3 4 5 6 7 8 9 10 11 12 13 14 15 | |
自定义类似\startitemize的结构列表:
- \defineitemgroup[myitems]
- \setupitemgroup [myitems] [each] [joinedup]
- \setupitemgroup [myitems] [each] [itemalign=flushright]
索引#
- \index[Alphabetical]{Index entry}
- \index{Entry 1+Entry 2+Entry 3},多级别(最多三级)
- \seeindex[Alphabetical] {Entry1} {Entry2+Entry 3},参见Entry2+Entry 3
- \placeindex
- \placeindex
- \completindex
- \setupregister[index][Configuration]
生成其他索引
- \defineregister[IndexName] [Configuration],自动生成命令:
- \IndexName
- \placeIndexName
- completeIndexName
- \setupregister[IndexName] [Configuration]
引用和超链接#
pdf书签
- \placebookmarks[List of sections]
- \placebookmarks[all]
先设置交互,再设置书签才有效。
同义词#
排序#
mark标记#
- \marking[IDENTIFIER][CONTENT], TEX \mark
- \getmarking[mark][page name number][...]
- ...: first last current previous next top bottom default both all first:nocheck last:nocheck previous:nocheck next:nocheck top:nocheck bottom:nocheck
- \getmarking [IDENTIFIER...][first|last|previous|both|all|current]
1 2 3 4 5 6 7 8 9 10 11 12 13 14 15 16 17 18 19 20 21 22 | |
引用#
参考: https://wiki.contextgarden.net/References
- 交叉引用模块: https://wiki.contextgarden.net/Cross_Referencing
- \setupcrossreftext
- \crossref
- 段落引用模块: https://wiki.contextgarden.net/Paragraph_Referencing
设置:
- \setupreferencing
- \definereferenceformat 设置自己的引用命令
- \setupinteraction 控制链接交互的格式
- \setupreferencestructureprefix [default] [prefixsegments=2:2]
- \definestructureseparatorset [default] [,,-]
锚点:
- \reference[reference,...]{text}
- \chapter[reference]{text}
- \pagereference[reference,...]
- \textreference[reference,...]{text}
[reference]可使用命名空间进行分类:[fig:cow]
引用:
- \in {text}{text}[reference] 引用数字编号,只适用于编号的条目
- \at {text}{text}[reference] 引用页码
- \atpage [reference]
- \somewhere {text}{text}[reference]
- \about {text}[reference] 引用文本(引用的标题)
- \setupreferencing 改变\about的输出
- \ref[default| text| title| number| page| realpage][reference] 自定义用,可结合\goto
1 2 3 4 5 6 7 8 9 10 11 12 13 14 15 16 17 18 19 | |
在校样上显示引用 \showreferences
获取标签、章节标题的引用(reference)信息,如编号、页码等:
context-part-chapter-section-and-subsection-names by Aditya
The following variables give information about the current section (from strc-sec.mkiv):
1 2 3 4 5 6 7 8 9 10 11 12 13 14 15 16 17 18 | |
其他:
1 2 3 4 5 6 7 8 9 10 | |
用法:
1 | |
黄:经实测,很多已不能用,需要根据strc-sec.mkiv更新。有时用\ref更可靠。
另见\getmarking[chapter] \getmarking[chapternumber] \getmarking[sectionnumber]
另有\label,文档较少。
预置引用#
注册器#
字符、词语、文本#
大小写
- \word{text}: 小写
- \Word{text}: 首字母大写
- \Words{text}: 多词语首字母大写
- \WORD{text} or \WORDS{text}: 全部大写
- \cap{...\nocap{...}...} 小型大写字母
- \Cap{} 伪小型大写字母
上下标
- \high{Text}
- \low{Text}
- \lohi{Subscript}{Superscript}
- 公式中用“_” and “^”
字面文本 Verbatim text
- \type 第一个参数是边界符号
- \type {This is without curly bracket}
- \type This is a closing curly bracket: ‘}’
- \type 1Tweedledum and Tweedledee1
- \type |Tweedledum and Tweedledee|
- \type zTweedledum and Tweedledeez
- \type (Tweedledum and Tweedledee(
- \starttyping ... \stoptyping
- \typ 断词版
- \tex 保留字会执行
复合词语的连接
文本的语言设置
- \mainlanguage
- \language \<语言代码> 文档中临时改变
- \setuplanguage[Language][Configuration]
- \setuplanguage[en][patterns={en, agr}] 英语和古希腊语(防止替换)
English en, eng, english Japanese ja, japanese chinese cn, chinese
会影响:
- 断词
- 某些词语的输出格式
- 某些的排版传统
跟语言相关的标签文本
比如章节中的“第”“章”。
- \setuplabeltext[Language][Key=Label]
- \setuplabeltext[es][figure=Imagen~]
- \setuplabeltext[chapter=Chapter~]
可参考语言文件lang-txt.lua
1 2 3 4 5 6 7 8 9 10 11 12 13 | |
语言相关命令
- \currentdate[month, dd, weekday]
- \date[d=6, m=7, y=1957][weekday]
- \month
- \translate[es=Su carta de fecha, en=Your letter dated] 根据语言取值
- \quote and \quotation
水平空白/间距#
- 某种字体的词语间距 \fontdimen2\font \fontdimen2\font \fontdimen4\font
- \hskip and \hfill 绝对值(可以是负值)空格,\hfill可用在行头行尾
- hskip1em plus 1em minus .5em,弹性胶
- \kern1cm,字符硬间距
- \mkern⟨mudimen⟩
- \hspace,预先定义的特定类型的空白
- \, 千分位空格
- \space or “\␣” 半角空格
- \enskip, \quad and \qquad 半个em, 1 em or 2 ems
使用\nobreak来限制在空白处断行。
spac-chr.mkiv中规定的其他空白:
https://tex.stackexchange.com/questions/538654/non-breaking-hspace-in-context
1 2 3 4 5 6 7 8 9 10 11 12 13 14 15 16 17 18 19 20 21 22 23 | |
水平间距
- \setupspacing[broad]
- \setupspacing[packed]
字符间距
- \stretched[Configuration]{Text}
- \stretched[width=4cm]{\bf test text}
- \stretched{test\text} 扩大\指定位置的间距,撑满行
- \setupstretched
- \definestretched
- \setupcharacterkerning
- \definecharacterkerning
垂直间距/空白#
分段:
- 连续一个到多个空行
- \par
- \endgraf
插件垂直空白/空行(不建议使用\vskip \vfill):
- 优先使用\blank[Dimension],累加无效 blank
- \blank[force],强制空行,不可缩减,比如设置答题空间时
- \blank[disable],取消后面的空行
- \blank[back],取消前面的空行
- \blank[overlay],重叠,即负空行
- \blank[samepage],禁止分页
- 空行 \emptylines[4] 等于 \blank[4*line]
- \godown[Dimension],可以累加
段落缩进:
\setupindenting[...,...]
[...,...] [+-]small [+-]medium [+-]big none no not first next yes always never odd even normal reset toggle dimension name
- always:所有段落缩进
- yes:一般段落缩进。特点段落额外增加垂直间距,如小节起始段落;后面跟着某些环境的段落不缩进。
- no, not, never, none:禁用段落缩进。
1 | |
窄段落/两侧缩进/扩大页边:
- \startnarrow[...=...,...] ... \stopnarrow (接受键值对参数)
- \startnarrower[...,...] ... \stopnarrower
段间距/段落间距:
\setupwhitespace
- none
- small, medium, big:相对字号而言
- line, halfline, quarterline:相对行高而言
- DIMENSION:指定绝对尺寸,如\setupwhitespace[5pt].
无段落间距
\startpacked[Space] ... \stoppacked
指定位置插件间距,比如标题后
1 2 3 4 5 | |
- \setupblank
- \defineblank[Name] [Configuration]
行间距、行距:
% 设定行间距、行距 %尺寸;符号:reset、small、medium、big、on、off;或用\defineinterlinespace定义的名字; %或命名参数:line=8ex(line, height, depth, minheight, mindepth,distance, top, bottom, stretch and shrink.)
1 2 3 | |
断词
- \hyphenation{union-ised, man-slaughter}
- \unhyphenated
- \hbox 盒子不会断开
- \pretolerance and \tolerance
- 手动断行 \break, \crlf or \
手动断行
\startlines One-one was a race horse. Two-two was one too. One-one won one race. Two-two won one too. \stoplines
可配置:\startlines[indenting={yes, small, even}]...\stoplines
或全局配置:\setuplines[indenting={yes, small, even}]
带行号:
\startlinenumbering[Options] ... \stoplinenumbering
- \setupalign[right] %全文设置
- \setupalign[horizontal, morehyphenation]
- \setupalign[reset]
- \startalignment[Options] ... \stopalignment % 对齐
选项:
broad wide bottom height line high low lohi flushright flushleft middle yes no width normal reset inner outer flushinner flushouter left right center disable last end paragraph lefttoright righttoleft l2r r2l table lesshyphenation morehyphenation hanging(标点悬挂/突出 protrusion) hangingboth nothanging hz fullhz nohz hyphenated nothyphenated tolerant verytolerant stretch extremestretch final 1*final 2*final 3*final 4*final more 1*more 2*more
- normal or width or yes,对齐
- middle,行居中对齐 (实测会拉伸字距,等于
center, wide,当是与center弄反了) - flushleft or no or right,左对齐/右填充 (right源于ragged-right,不建议用)
- flushright or lef,右对齐/左填充(同上)
- inner,推向内边(margin)
- outer,推向外边
- disable,仅用于单行段落,等于flushleft,但段末\parfillskip为0
- last,对齐,最后一行居中
怎么控制行宽
- wide,让ragged-right, ragged-left, and middle行更宽些(实测是保持固定宽度)
- broad,近似,用于表格
你希望末行在哪里结束
- bottom,底部填充
- height,撑满高度
- line,字下伸触及下面的边界
在盒子中竖向对齐,比如在\framed或表格中
- high Align to top
- low Align to bottom
- lohi Vertically centered
预定义组合
- table,等价于flushleft,broad,high
- reset,等价于normal.
- center,等价于
middle, broad(实测不然,不会增加字距,当是与middle弄反了)
排版/文本流方向
- lefttoright or l2r,"Hello, world."
- righttoleft or r2l,".dlrow ,olleH"
更好的调整和局部排版
- hanging,允许悬挂标点/突出(protrusion)
- nothanging,禁止悬挂标点
- hz,允许轻微拉伸字符/字体伸展(font expansion).
- nohz,禁止字体伸展
- hyphenated,允许断词
- nothyphenated,禁止断词
- lesshyphenation,更少断词. Not sure whether this is relative/additive, or absolute.
- morehyphenation,更多断词. Not sure whether this is relative/additive, or absolute.
- tolerant,放松最终段落操控(更多断词和拉伸)以避免超出盒子。
- verytolerant,更加放松最终段落操控
- stretch,运用空白额外拉伸,通常配合(very)tolerant使用
单行水平对齐:
- \leftaligned, \midaligned or \rightaligned
- \wordright,行内词语右移到头
特殊结构和段落#
脚注、尾注、边注、行号注、局部注
边注,如: * \margintext * \inmargin * \inoutermargin
分栏:
- \startmixedcolumns ... \stopmixedcolumns
- \startitemgroupcolumns ... \stopitemgroupcolumns
- \startboxedcolumns ... \stopboxedcolumns
- \startcolumns[Configuration] ...\column...\stopcolumns
- \setupcolumns[Configuration]
并行段落
有结构列表
描述和枚举
线和框
- \hairline 整行下画线
- \thinrule 文中,平均撑满整行(类似\hfill);一行可以排多组
- \thinrules[n=2] 多行
- \hl[3] and \vl[3] 固定长度的线,单位em
- \fillinline[width=1cm]{Name:}, 行内填充线(填充线对齐右侧,线长可调)
- \fillinrules[]{}{} 多行填充线(填充线对齐右侧,或居中)
- \blackrule \blackrules 铅条,铅线
- \blackrule[width=12em,depth=4pt,height=-3.5pt]
- \startmarginrule ... \stopmarginrule 段落边缘线
文本装饰,与文本关联的线
- 文字两侧画线
- \textrule{Example text}
- \starttextrule[Configuration]{Text on the line} ... \stoptextrule
- \setuptextrule
- \setupbar 设置参数
- \bar 预定义实例
- \overbar,上画线
- \underbar,下画线,完形填空用
- \overstrike,删除线
- \understrike,字下删除线,如马克笔效果
- \overbars,逐词……
- \underbars
- \overstrikes
- \understrikes
- \underrandom,不规则(随机)下画线
- \underrandoms
- \underdash,下画断线
- \underdashes
- \underdot,下画点线
- \underdots
- \nobar
- \hiddenbar
- \definebar 自定义实例
- \resetbar 清楚
完形填空 % !!!标点符号处理过程导致下画线丢失,或禁则失效 % 可能是标点模块删除标点前后的空白造成的 % 临时处理方法是只在填空前面加kern \definebar[clozeBar][underbar][continue=yes, color=black, offset=-0.5] \def\cloze #1{% \startbar[clozeBar]% \scratchdimen\widthofstring{ #1}\relax % 获取文本宽度 \zwj\kern1\scratchdimen \color[black]{ #1}% \kern.5\scratchdimen\zwj % U+200D ZERO WIDTH JOINER \stopbar% }%
也可以用\blackrule模拟:
\def\b{\blackrule[width=1em,depth=4pt,height=-3.5pt]\hspace[0em]}
加框文本
- \framed 适合短文本,框底齐行
- \inframed 行内基线对齐的文本,等于\framed[location=low]
- \framedtext, 适合多段落,宽度默认为0.75\hsize
- \startframedtext
可重用的缓存文本
- \startbuffer[BufferName] ...\stopbuffer
- \getbuffer[BufferName]
其他环境和建构
- 化学式
- 算式
- (浮动体、图像)联合体
- 隐藏文本 \starthiding...\stophiding
- legend 公式说明
- 行调整(比如在加框的情况下)
- mode 编译时进行模式匹配
- 左右也相对
- 引用
- standardmakeup标准修饰 如每页有文件名
图像、表格和其他浮动对象#
- \externalfigure[img.jpg]
- \placefigure[Options][Label] {Title} {Image}
表格:
- Tabulate (tabulation, 线表,适合简单需求)
- TABLE (适合natural tables, HTML tables)
- xtables (extreme tables – 与natural tables更好兼容,利于分页)
- framed tables (适合跨越几百页的简单表格)
- database模块,可排数据表
1 2 3 4 5 6 7 8 9 10 | |
视觉对象分组:
1 2 3 4 5 6 | |
zhfonts#
标点压缩和字体设置模块
安装目录:
D:\venvs\texlive\2021\texmf-dist\tex\context\third\zhfonts\
使用:
\usemodule[zhfonts] %
可能造成字体找不到的情况(当时汉字码表设置问题),则禁用t-zhfonts.lua中的字体设置功能,只保留标点压缩功能:
1 2 3 4 5 6 7 8 9 10 11 12 13 14 | |
或直接使用仿制的t-zhspuncs.mkiv:
1 2 3 4 5 6 7 8 9 10 11 12 13 14 15 | |
相应更改t-zhspuncs.lua:
1 2 3 4 5 6 | |
使用:
\usemodule[zhspuncs]
ruby和行间标注#
1 2 3 4 5 6 7 | |
设置主体文本(base text)与ruby文本布局:
1 2 3 4 5 | |
设置ruby文本与周围文本重叠与否:
1 2 | |
设置ruby和主体文字(base text)的间距:
1 2 | |
可以只改变单个命令的设置:
1 | |
叠置/重叠/左右错位/凸排
- \clap{whatever} 居中叠置
- 定义为
\def\clap#1{\hbox to 0pt{\hss\strut #1\hss} }
- 定义为
- \llap{whatever} 左侧叠置
- 定义为
\def\llap#1{\hbox to 0pt{\hss #1} }
- 定义为
- \rlap{whatever} 右侧叠置
- 定义为
\def\rlap#1{\hbox to 0pt{ #1\hss} }
- 定义为
\strut 能利用字体的结构深度(基线、空白等),否则只有轮廓线
\hss胶等于\hskip 0pt plus 1fil minus 1fil, 它会吸掉\llap或\rlap参数的所有宽度,无论正负。
泡泡框:tikz宏包
latex
- \overset{\makebox[0pt]{(\scriptsize animal)}}{Bears}
- \underset
- \labeltext
下画线#
1 | |
盒子 box#
对齐盒子
1 2 | |
更多盒子:
- \vbox 底部行对齐前面的元素
- \vtop 头部行对齐前面的元素
- \cbox 内容垂直居中
- \lbox
- \lbox to 4cm{... text ...}
- \rbox
- \sbox 具有strut的高度(字体设计的行间高度,包括留空),可以基线对齐
- \hbox 水平盒子,对齐行基线
- \tbox(对齐行顶线) and \bbox 表格盒子(有strut属性,对齐底地线),也用于图表
显式盒子
- \ruledhbox 带线的盒子
- \ruledvbox 带线的盒子
- \ruledvtop 带线的盒子
- \showboxes 显式所有盒子
- \showmakeup 显式标记信息(包括盒子)
用盒子标注拼音(实际情景请用官方的ruby模块)
中文此间距glue处理似乎没有中文字符盒子的问题
1 2 3 4 5 6 7 8 9 10 11 12 13 14 15 16 17 18 19 20 21 22 | |
测量参考行的盒子宽度,居中排一首诗歌:
1 2 3 4 5 6 7 8 9 10 11 12 | |
\startlines本身也可以设置后用于排版诗歌,参考官网的Verse主题。
尺寸计算必须使用宏\dimexpr,如:
\dimexpr 165mm * 2 + 20mm\relax
(第一个元素必需是dim,参考: https://wiki.contextgarden.net/Expressions)
还可以结合lua函数string.splitlines(str) buffers.getlines() string.strip()等自动处理各行/逐行处理:
1 2 3 | |
参考
- Getting the content of source lines in a \startlines \stoplines env?
- using an end of line as parameter
文本行缩放#
1 2 3 4 5 6 7 8 9 10 11 12 | |
悬挂缩进#
1 2 3 4 5 6 7 8 9 10 | |
缩放、镜像、剪切#
https://wiki.contextgarden.net/Scaling_Rotating_Mirroring_Clipping
系统宏#
https://wiki.contextgarden.net/System_Macros
视觉调试与跟踪#
- Visual_Debugging
-
\trace...切换跟踪- \tracingnodes1 %1,2
\show...即时显示- \showlayout[pt,cm,1] % 默认输出4页
- \showsetups % 只输出设置尺寸,与上项等效
- \showglyphs % 显示所有字模的方框
- \showboxes%盒子
- \showglyphs%字模轮廓
- \showframe%框架
- \showframe[text]
- \showmakeup%额外信息
- \showreferences
跟踪
在可能的错误附近打开所有追踪:
1 2 3 | |
grep脚本(源码全文检索):
1 | |
显示跟踪器和命令列表:
1 2 | |
1 2 | |
缺字跟踪
\enabletrackers[fonts.missing]
缺字替换
\replacemissingcharacters
缺字体时替换为方块,并且可以拷贝、搜索。
或如下设置字体确实报错信息:
1 2 3 4 5 6 7 8 9 10 11 12 | |
段落与页面构成
\showmakeup[...]
[...]makeup reset boxes all hbox vbox vtop kern glue penalty fontkern strut whatsit glyph simple simplehbox simplevbox simplevtop user math italic origin discretionary expansion line space depth
三个快捷选项:
- makeup,页面布局
- boxes,盒子构成
- all,大部分有用选项
项目结构#

1 2 3 | |
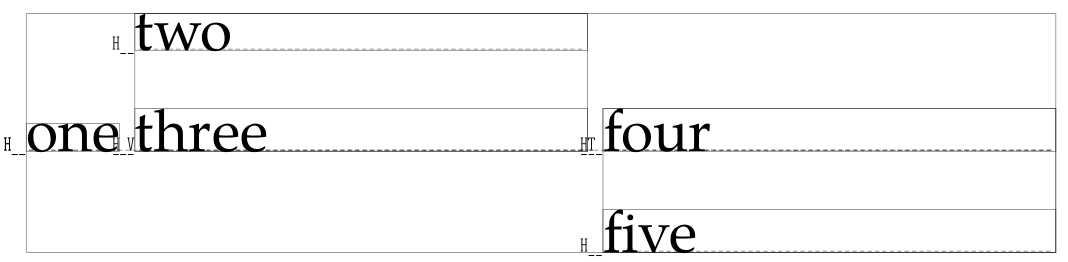
层/图文堆叠/图文定位#
- layer,它是ConTeXt的页面坐标定位机制,以及元素随页码变化而切换的机制等;组合多个对象为页面的一层。可用于背景/前景设置,给整页图加标签,给页面加页码,等等。未写入正式文档。官方web文档
- overlay,在同一点上堆叠多个对象为一个小型图文对象,可用于framed类对象的前景和背景。
- collector,相对于可以用坐标定位的overlay,组合多个对象(如图文)为一个对象;本身还可以组合(composedcollector)。参考官方文档details.pdf。也可以用MetaPost(MetaFun)的
thetextext[.anchor](str,pos)thelabel(string,pair)draw externalfigure "mycow.pdf" scaled 3cm等实现。
在pdf文件中添加附件#
1 2 3 4 5 | |
生僻字造字拼字#
\hbox{\hbox{辶}\kern-.7em\scale[sx=0.7,sy=0.9]{\raise 0.1em\hbox{頃}}}
压缩会导致笔画变细,且横竖向粗细不协调。在ai中,从结构一致的字中拆部件来用是最好的。
字间距/字符间距#
inter-glyph kerning, Inter-character kerning, or inter-character spacingis, 通常是在字体设计层面处理的。但也可以调整:
1 2 | |
标题拉伸(充满给定宽度):
1 2 3 4 5 6 7 8 9 | |
观察字符字间:
1 2 3 4 5 6 7 8 9 10 | |
额外的字体字间(Extra font kerns)#
在字体设计的特定字符组合(如AV)间的字间基础上,再设置额外的幅度:
\setextrafontkerns
观察字体字间:
\showfontkerns
浮动体#
- 浮动体 \definefloat
- \chemical
- \figure
- \table
- \intermezzo
- \graphic
- \startfloattext ... \stopfloattext
- \startchemicaltext ... \stopchemicaltext
- \startfiguretext ... \stopfiguretext
- \starttabletext ... \stoptabletext
- \startintermezzotext ... \stopintermezzotext
- \startgraphictext ... \stopgraphictext
- 行首/首字下沉(Drop caps) \setupinitial
- 文本围绕行首浮动体悬挂 \starthanging ... \stophanging
偏置、提高盒子#
- \offset
。它的offset参数会像\raise那样影响行高,而使用y参数不会(导致重叠)。
\dontleavehmode 正常文本\offset[y=-3em,x=0em,width=0pt]{偏置文本}正常文本 - \glyph
xx\glyph yoffset 3emf\relax oo` - \raisebox
\dontleavehmode\raisebox{1pt}\hbox{f}oo
存取数据(multi-pass数据)#
- \definedataset[mydataset][delay=yes] % delay能添加页码信息
- \setdataset[mydataset][mytable][field1=text 1, ...]
- \datasetvariable{mydataset}{mytable}{myvariable}
1 2 3 4 5 6 7 8 9 10 11 12 13 14 15 16 17 18 19 20 21 22 23 24 25 26 27 28 | |
lua存取数据:
1 2 3 4 5 6 7 8 9 10 11 12 13 14 15 16 17 18 19 | |
参考: * definedataset * Multi-pass_data
交互控件#
比如可以填写的表单。
https://wiki.contextgarden.net/Widgets
模式#
可自定义并开、关模式,实现按模式有条件处理。
1 | |
可以结合Setups使用,实现有条件的切换设置。
有一些常用的系统模式可用(均以*开头):
- *mkii Enabled when running MkII
- *mkiv Enabled when running MkIV
- *first Enabled during the first compile run
- *export Enabled when \setupbackend[export=yes] is set
- *project Enabled when inside \startproject ... \stopproject
- *component Enabled when inside \startcomponent...\stopcomponent
- *environment Enabled when inside \startenvironment ... \stopenvironment
- *text Enabled when inside \starttext ... \stoptext.
- *frontpart Enabled when inside \startfrontmatter ... \stopfrontmatter
- *bodypart Enabled when inside \startbodymatter ... \stopbodymatter
- *backpart Enabled when inside \startbackmatter ... \stopbackmatter
- *list Enabled inside a list entry
- *marking Enabled inside a marking
- *register Enabled inside a register
- *chapter, *section, etc. Enabled inside the corresponding section head.
- *en-us, *nl, etc. Enabled when the current \language is en-us, nl, etc.
- *en-us, *nl, etc. Enabled when the \mainlanguage is en-us, nl, etc.
- *figure Enabled when a graphic is found
- *interaction Enabled when interaction is enabled
- *grid Enabled when grid typesetting is enabled
- *singlesided Enabled when singlesided layout is enabled
- *doublesided Enabled when doublesided layout is enabled
- *pdf Enabled when the main output is pdf
- *dvi Enabled when the main output is dvi
可在lua和命令行中使用模式:
1 2 3 | |
1 | |
在第一遍中执行外部系统命令:
1 2 3 4 5 6 7 8 9 | |
系统宏编程#
所有命令的设置项的签名#
https://wiki.contextgarden.net/setting_sigs
计数器#
控制页码、序号等。
https://wiki.contextgarden.net/Counters
计数传统与转换(数字与字母等不同传统之间):
可以通过计数器、转成字符串来生成不重复的引用名等(能否通过csname生成宏名称??)
定义枚举enumeration,用于自定义多级列表,如习题、问题列表
文本背景、文本高亮#
文本绕排#
泡泡框、对话框#
脚本工具#
查找命令所在的位置(文件、行号):context --find="%\starttabulate"
获取文件名,含路径:
\getdocumentfilename{1} \cldcontext{document.files[1]}
绘制节点图nodes#
比如思维导图。
参考: * nodes.tex nodes.pdf * meta-nod.mkiv meta-nod.lua